Tuesday, May 1, 2012
Week 15 Flashback and Instructables Link
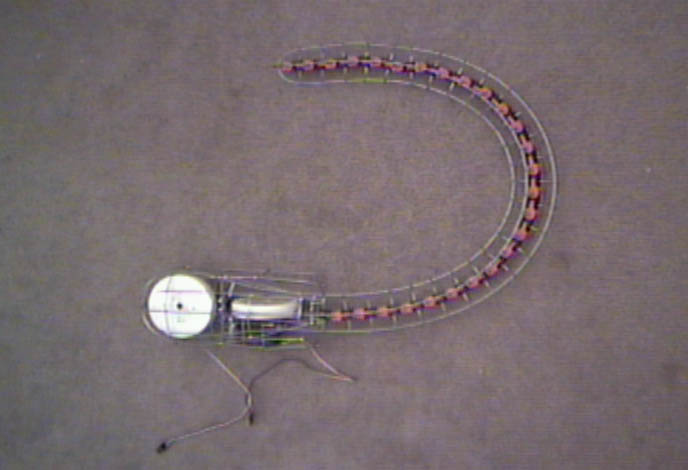
Well darn! The random sequences twist up the cables for the tail! No matter what values I plug in...I can't rely on it as much as the simple wag code based off sweep. And now I am afraid just for now that the Mindflex aspect of this project will have to be put on the back burner for now. I am pleased enough that the tail looks like it is wagging on its own. I am not giving up on this incredible idea! Oh no, I plan to continue working on it until it works. My instructable is finished. Here is the link: http://www.instructables.com/id/Arduino-Controlled-Wolf-Tail/
Week 14 Flashback
I now have a fur-covered tail! I have learned though that if the covering is too tight the tail will quiver not wag. All that's left to do is try to fix that darn code problem. Thomas and I have looked at this code and added a few libraries to it, made some alterations to the syntaxes and....nothing. Hmmm...I am starting to worry about this part. I will try to make a random sequence for the sweep wag I already know works.
Week 13 Flashback
After about 3 hours of soldering the servo housings are finally done! But now I have a problem...the cable keeps getting snagged on the cage I soldered together. After trying to fix that then one of my servos decides to stop working all together...NOOOOO!!! Seems like a single servo will have to do...Now then, the coding is still not working for the Mindflex. The arduino will not read the Mindflex at all now. Hopefully my professor will be able to help me out.
Week 12 Flashback
Well all the parts are in and now I begin working on building the actual tail part. I have been using the directions off of Wolftronix.com and so far have the spine built. It moves around great when I pull the cables back and forth! Next up the servo housings.
Spring Break Work
Finally I got paid and just ordered all the parts that I needed to continue working on the final project. I am using my Instructable as my final project. I ordered: two servos, brake cables, Klixx, fur, and a couple other small things. Should be in within the next week or so. Meanwhile I am continuing the code work of the MindFlex part of this project. Starting to run into a few bugs...
Monday, March 26, 2012
Final Progress
I have settled on a project that helps the user see their concentration level in the form of lights. My idea is based on the classic cartoony notion that a lightbulb lights up when the character has an idea. I am in the process of designing said object and writing the code/sketch for the arduino to brighten and fade to the user's concentration level.
Week 10 Flashback
The demo was quite interesting. Seeing how they reacted was a bit amusing. The feedback I got I am using to improve my overall project. I have continued to gather more data for both projects.
Week 9 Flashback
The serial labs have come in handy for understanding the data that the Mindflex uses. I have been actively testing myself with the data and am coming up with some interesting results. Preparing the demo was frought with challenges. First of all debugging the Brain SerialOut sketches which it turns out was relatively easy. All I had to do was change two little words and the program began spitting out number packets every second. Then I tried to upload the sketch into Processing, which I was unsuccessful in doing due to multiple complications storing the right libraries and so on. The week was challenging, but I look forward to showing you the mind actively working and the data being collected at the same time.
Research Update on Final
So I have finalized that I will be using the second Mindflex in a similar fashion to my Instructables. I have begun gathering the data of the various EEG values and am trying to correlate them somehow into a statement/function. Mostly the Delta values have been the highest when I am quietly meditating, but Theta/deep sleep keeps claiming first in any other situation. Seems that the data may have a few bugs in it...
Tuesday, March 13, 2012
Analog Input Labs
To visually see the information being sent out of the computer into the Arduino was quite fascinating. While I was only able to understand the bare minimum of the coding I do know that this information has come in handy with both my final project and my instructables to be able to see the number coding that correlates to different thought patterns within my Mindflex headband. The coding is very similar to the Javascript that I work with in a different class in that there are libraries with more information and functions.
Tuesday, March 6, 2012
toneMelody Sketch in Simple Language
/*
Melody
Plays a melody
circuit:
* 8-ohm speaker on digital pin 8
created 21 Jan 2010
modified 30 Aug 2011
by Tom Igoe
This example code is in the public domain.
http://arduino.cc/en/Tutorial/Tone
*/
#include "pitches.h"
// notes in the melody:
int melody[] = {
NOTE_C4, NOTE_G3,NOTE_G3, NOTE_A3, NOTE_G3,0, NOTE_B3, NOTE_C4};
// note durations: 4 = quarter note, 8 = eighth note, etc.:
int noteDurations[] = {
4, 8, 8, 4,4,4,4,4 };
void setup() {
// iterate over the notes of the melody:
for (int thisNote = 0; thisNote < 8; thisNote++) {
// to calculate the note duration, take one second
// divided by the note type.
//e.g. quarter note = 1000 / 4, eighth note = 1000/8, etc.
int noteDuration = 1000/noteDurations[thisNote];
tone(8, melody[thisNote],noteDuration);
// to distinguish the notes, set a minimum time between them.
// the note's duration + 30% seems to work well:
int pauseBetweenNotes = noteDuration * 1.30;
delay(pauseBetweenNotes);
// stop the tone playing:
noTone(8);
}
}
void loop() {
// no need to repeat the melody.
}
------------------------
This sketch programs the Arduino to play a sound or melody in accordance to the notes written. The circuit uses an 8-ohm speaker that is set to be plugged into pin 8 on the Arduino. The code already shows that it references "Pitches", the various sounds that Arduino can call upon. The numbers 4 and 8 refer the types of musical notes; a quarter note and an eighth note. The sequence of numbers equivalates to a sequence of musical notes. In the parenthesis, that is a for statement, which tells the Arduino a rule. The duration tells the Arduino how long to play the sequence for. The pause statement tells it how long, if any, the pause inbetween each number/note lasts. The last line in the main bracket tells it to stop the sequence. Void loop means that the sequence only plays once and does not repeat.
Relay Lab
Soldering the wires to the relay was a bit difficult by myself, fortunately a fellow classmate was eager to lend me his hands. I almost soldered the wrong wires to the switches, fortunately I didn't. Then I had to separate one of the wires from the lamp and cut it, which by the way was quite thick with insulation. Then I had to tie the relay wires to the exposed wires then tape them together. I programmed a sketch into the Arduino that simulated a racing heartbeat and was excited to see the light flicker to the sketch. But when it came time to test my light would not turn on. Turns out that the contacting wires were not contacting. With a simple press of my fingers the light blinked in unison to the clicking Relay and I was satisfied.
Instructables Update
I am still awaiting payment for the remaining parts of the tail. I am seriously considering making my own spine components using the MakerBot software due to difficulties trying to locate the specific LEGO pieces or Klixx parts. I am still planning out the Arduino Sketch for the controls. The MindFlex is still being tested with and I am constantly training my mind to concentrate at certain levels so that I can fully master the control for when it comes time to use it on the tail.
Technologies for Final Project
I am pursuing something that will be reactive to a person's prescence and make a noise in response. I will be needing to find a light sensor and motion sensor. Perhaps I will embody this technology into a stuffed animal since I really enjoyed the Blinking Light project from earlier.
Week 8 Flashback
The critique was quite useful for me and I know that I should have covered the battery instead of let it hang out the back. The lab was interesting and a tad dangerous when it came to splicing the wires off my lamp and tie them to the relay's wires. I already shocked myself twice holding the two parts together when the taping I had previously done to secure them failed. But so see the light flickering to the sketch I had written was stunning and quite entertaining.
Tuesday, February 28, 2012
Project 2: Noisy Sound Toy Hack
The sound toy that I had decided on hacking was the Taco Bell Chihuahua plush that was given away to children when they purchased a meal at a sponsoring restaurant. The sound board was encased in a plastic box, with a slitted disk in the middle that when pressed would activate the sound board and cause the toy to say "Feliz Navidad Amigos!" in a muffled Spanish tone. The speaker connected to the board was quite small and therefore I upgraded to a larger speaker. The sound quality was amplified two-fold. I spent close to an hour taking practice wires and touching the various solder points on the board and found that by by-passing the first resistor that I could loop the phrase endlessly. After soldering the wire to the points, I had unintentionally caused a short in the board and rendered it useless. At first I thought that perhaps I had used up all the power of the three watch batteries and tried incorporating the board to the oscillator board I had made in one of the class labs. I soldered wires connecting the terminals of the toy's board with two resistors to lessen the amount of power that the board would receive to the battery terminals of the oscillator board. Alas it did not make a difference. I strived to try and hack another sound board, so I went out and bought a cheap "No Bark" device that emits both a warning "beep" and a high-frequency wave to deter dogs from barking. The board inside the device was more complex than I had originally thought, but was determined to hack this board and incorporate it with the oscillator. I found that instead of having to press on the activator button I could simply touch a wire on any of the six points. I also found that by touching the solder point over the indicator light with the chip next to it that I could change the color of the light; however, by doing so I had yet again created a short, a puff of smoke emerged from the contacts, and the board smelled of burned circuitry. I knew then that I could not hack another board and focused the rest of my time to housing and creating a new interface for the still-working oscillator. The case for the "No Bark" device had the ideal space to house the main circuitry and I went to work altering it's purpose. First I had to remove the batteries and cut away excess material on the inside of the plastic to make room for the oscillator. The battery space housed the main board. Using an Exacto knife, I drilled five additional holes on the top shell for the contact wires to be threaded through. At first I had wanted to encase the speaker into the shell but found that I could not safely mold an extension of the shell without the risk of the board and plastic melting while the clay baked. That is why I attached the speaker to one end of the shell, away from the user and in the direction of the intented direction. I could not fit the battery anywhere into the small shell so I let it hang out the back end of the device, which provided to be useful in the case I quickly needed to turn the device off. I found a container of old copper-coated BB's and attached them to the exposed wires of the existing contacts. The final result of the device is mechanic in appearance; however, quite loud in its pitches and the BB's are close enough to each other for quick manipulation of tone and pitch of the desired sound


Monday, February 27, 2012
Instructables Update
I have finally obtained the essential Mindflex system and have been using/playing around with it to get a feeling of how to control my thought processes. While I wait to purchase the remaining tail components, I am working on writing an Arduino program for the board I will most likely have to build to replace the original micro-controller that the Instructable Wolf Tail recommends. Once I have written the program then I can proceed with the construction of the tail-spine and servos.
Week 7 Flashback
This week was very "open" with no formal classes. I took the time Tuesday and Thursday to tweek my Sound-Toy Hack. The extra time was quite helpful due to a few complications I ran into on the final steps of incorporating the board into the new "body."
Final Project Inputs and Outputs
For inputs I am quite interested in the photodiodes and phototransistors, though if need a simple push-button switch will suffice. Outputs that interest me for the final project are a buzzer, a piezo if I can figure out how to incorporate it, and stepper motors.
Monday, February 20, 2012
Final Project Idea?
Well the Final Project I know has to have an Arduino and a sensor and be able to be interacted with by the people. I currently do not know what I am going to do and am at a bit of a loss on where to look.
Week 6 Lab?
Well we did not get to the Relay and Hello World labs, I don't think...but I did work on my sound-hacked toy and ended up frying the circuit by crossing the first resistor. (May Pedro rest in peace) Thomas and I tried to bypass what we thought was a dead battery and incorporate it onto the extisting circuit I created, but alas, Pedro remained silent. The learning of the Arduino though was very interesting and I look forward to more lessons on how to program it.
Week 6 Flashback
Learning about the Arduino was fascinating in that there is so much we can do and program it to do. I already know that I will need to purchase one for my Instructables project and figure out how to incorporate it into the whole tail system. Presenting my Instructables idea was fun, I loved how everyone reacted. The quiz was a piece of cake, and though we did not get to the Relay lab, I was still eager and fascinated to learn that one could possibly control an AC feed object wirelessly. So many outside the classroom possibilities.
Week 5 Flashback
Ah good memories on working in Google Sketchup...good times...good times...Mostly focused on planning out my Instructables Project and decided on a Mindflex-controlled wolf tail. I have already purchased a Mindflex kit on Ebay and awaiting its arrival to my house in a few days. I am saving up money to purchase the servo and spine components that should be taking place in the next couple of weeks.
Monday, February 13, 2012
Intervention
Intervention
Who: Me, Myself and I (Emily Duerrwaechter)
What: Intervention of public space with blinking light circuit
Where: Destin Commons
When: Early Evening, Monday February 13th
How: Incorporate circuit into a stuffed animal and place it in one of the planted ledges where high foot traffic is noted.
The Setup


At first I required a "body" for the light circuit, so while at Target I stopped in at the pet section and found a cute fox toy with a sqeeky ball in it. The space between the eyes was ideal for the LEDs so I went ahead and bought it. I made a 3 inch incision in the back and removed the stuffing, then made two small holes in the eyes for the LEDs to fit through. Once I placed the circuit into the body and the LEDs through eye holes, I sewed the toy back up and wala; a toy with blinking lights.
The Results
Well, it was quite interesting seeing what happened between the public and my toy. I had already surveyed the area two days prior to my intervention and found that the central area near the Rave Theater had the most foot traffic. While the people traffic was at a minimum and the Security not walking around I planted my fox toy just under one of the ferns slightly in the shadows so that the lights would be visible blinking on and off. I sat at the nearby Starbucks texting random people. I brought my digital camera and set it under my purse flap facing the fox toy. Once everything was ready, I set the camera to record and left it alone. After 20 minutes had gone by I shifted positions to face a different flow of traffic for another 20 minutes. At first, no one really seemed to notice the little odd toy. Then when the sun started to set, that's when I finally got some reactions. One of the more humerous moments is of two separate occasions where security personnel stopped and looked around right next to the toy, and just walked off. I also had a little girl pick up the toy and almost walk away with it. Thankfully she understood that I needed it and gave it back. A couple of older folks also commented on it, and most people either did not notice it or noticed it and pretended not to. Seems those people were just too busy either on their phones or talking to others. Interesting enough though, those people that came up to look at the toy were not already occupied.
Instructables Update
After thinking about all the suggestions given to me by all of you lovely peers, I have decided to take the route of EEG controlled animatronics and make a tail that can be controlled by a hacked MindFlex headset. I have opted in using rabbit fur for aesthetics, since this tail will be saved for personal enjoyment. Currently I am waiting on an auction to end on Ebay for a new Mindflex set so that I can begin tearing it apart and hack the controls and sensors. I am also looking around for the tail spine components on various sites for the best deal. I can get the fur at Hobby Lobby easily when I have more money.
Monday, February 6, 2012
Sketches for Sound Project

Diagram of sound board to be implanted into one of either innocent objects shown below.


Final Decision
I will make my own hardback book, and design it to appear like a real one but in the pages hide contact points. The speaker will be hidden in the spine of the book facing out away from me. I will need to purchase wood to encase the book and decorative paper and design my own cover.
Instructables: Animatronic Tail
Overview
It has been a long time love affair of wolves for me. I have always liked letting out my inner wolf in the form of wearing jewelry with wolf icons. More recently though, my desire for them has grown significantly in the form of wearing a mock wolf tail. I wore it during a previous intervention project and loved every moment of it. Surprisingly, it felt natural wearing it. I looked on instructables and found one instructable for an animatronic tail, which utilizes a mini servo and a micro controller for a fluid variety of movements (http://www.instructables.com/id/Big-Bad-Wolf-Costume/step4/Animatronic-Tail/). Now, I plan to make and program my own board if I know how to by the time I get to that step; however, I can also make a pull string tail that is just as fluid and would be a cost friendly option to a mechanized tail. Separate supply lists will be provided for either a mechanized or a non-mechanized tail, along with a cheap vs. expensive list. I will also be providing detailed videos and images with step-by-step instructions for ease of use. Here is the main site where this person derived his instructable from (http://www.wolftronix.com/howto.htm).
Starting Supply List
- Faux Fur or Rabbit Fur (In case you wanna be realistic or are obsessed)
- Gauged Wire (Stronger the Better)
- Servos
- Micro-Controller
- Various Components (Can be found on Wolftronix Website)
- Bicycle link
- More stuff coming
Video Reference
Images


Week 4 Flashback
The construction of the soundboard was a bit challenging in that I had to clamp the components onto the board with my forceps in order to solder them together. Instead of using the same capacitors I changed one of them to a lower Farad reading and as a result, got a higher pitched arrangment of sounds from the touchpoints. I am now easily able to read sketches for soldering components; the map of them on the board, and differentiate each component based on their symbol. I am constantly playing around with the combination of touching certain wires and get a varied range of noises, from a low chirp to a nearly inaudible whistle that I feel is equivalent to a dog whistle.
Tuesday, January 31, 2012
NBC Chapters 3 & 4 Response
There are quite a few differences between a computer mind
and a biological mind; many of which can easily be interpreted. Well for one, our brains are a living,
breathing, and soft component of our body. A computer’s brain is a piece of
hardware and program that is built specifically to store data; it does not
breathe or necessarily “live”. When the
human body repeatedly interacts with an object or task, memory is created of
the said interaction and is stored in the part of the brain associated with
memory. This memory can be recalled at any moment again for the user to once
again complete the task. What makes this retrieval unique is that most of the
time it is done subconsciously, without having to tell ourselves to go fetch
that information and wait for the brain to do so. That is not how a computer
functions. A user has to program a “memory” into the computer and then command
the computer to bring up that memory. I can remember working with a robotic arm
in middle school and the tedious work of programming every single step into the
robot and remembering to save every little action. When the biological brain
saves the information, it is practically painless where as my fingers and
wrists began to ache after programming the robot for nearly 30 minutes
straight. And whereas when the human goes to reach for a glass, per say, the
actions are smooth, flawless, almost elegant in transition from the extension
of the arm to the folding of the fingers around the glass whereas for a robotic
arm to perform the exact same actions in the same flawless manner, nearly a
hundred commands or more must be inputted precisely. However, there is
technology being worked on that can give computers “artificial intelligence”,
where they will be able to “learn” as biological organisms can.
Monday, January 30, 2012
Week 3 Flashback
I had a lot of fun playing around with my Taco Bell Chihuahua circuit board so far. The speaker had some evidence of age on it, but it still worked, though quite muffled. I replaced it with a larger speaker and now the replay is in much better quality. While testing the circuit board, I accidentally placed my thumb over the first resistor effectively creating a jump and thus causing the rate of the playback to be much faster and more interesting than the intended playback rate. I plan to find a potentionmeter to solder to the board as well as either find something to make it play in a loop or have it so I can play it wirelessly from a distance.
Monday, January 23, 2012
Week 2 Flashback
Well...I sure remember most of this week's lecture and it brings back more memories of my Physics class...though I never got to actually solder back then, it was still a fun process to learn. I remember how to read a capacitor and determine polarity of it, how to solder properly, how to practice on a bread board before soldering components. Soldering is a lot of fun for me, I even finished the first soldering assignment mere moments ago, utilizing a 10mF capacitor in place of the 4.7 that came with the kit. I love looking at my work...amazed that I could do it all by myself. I look forward to more soldering in the near future. I will keep memorizing the different components and their associated symbols. Whenever I test my circuit, I always keep my capacitor in hand just in case I find something not working properly.
Chapters 1 & 2 Response
Technology is a part of our everyday lives, whether
integrated into our bodies as medical devices or utilized outside for various
tasks, such as a smart phone. The medical industry has been quite busy
producing and designing new medical devices to assist those with disabilities.
These various devices have undergone numerous aesthetic changes so that they
appear “seamless” with the wearer, an integrated sort of technology, which the
user can essentially be called a cyborg.
We cannot escape the reality that is we rely on technology, whether for
medical reasons or personal reasons. And
the need for them to become a part of us without actually penetrating the skin,
per say, has greatly increased. What would be great, in my opinion though, is
if such simple devices such as a clock or a phone could be integrated into our
bodies. That way, for one reason, we couldn’t lose our phone or watch by
setting it down somewhere and forgetting about where we placed it. We could
easily access it for whatever use and we could go anywhere without actually
having to hold onto it. The possibilities of this integration are endless.
Already the Bluetooth makes it easy for people to drive and talk safely, able
to keep both hands on the steering wheel and focus on driving. All it would
take is a couple of tweaks and a way to integrate it into the body’s inner
workings, without actually being physically wired to the nerves and skin, since
this is not the intentional purpose that the author is trying to convey. But
there are many advantages to having technology a part of us; the medical field
has already proven this through their pacemakers and hearing aids. The devices merely bypass a defective part of
the target area, thereby not replacing said area, but offering a separate, more
efficient path for the body’s function to go through. Again, we cannot escape
the reality of integrative technology; it is only a matter of time before all
of us are cyborgs in one way or another.
Monday, January 16, 2012
Week 1 Flashback
Well, I know that everyone had a hellish week last week but we all survived! The lectures on Electronics and Physics brought back memories of my Physics and Chemistry classes, ah those were the days...Remembering the structure of an atom and how electricity works...simply beautiful. I thoroughly enjoyed both of the labs, learning and remembering how to construct simple circuits. I still love throwing my LED Throwie at the refrigerator at home and knowing that such simple components illustrate such an important concept is pleasing to the mind. And I have played around checking the conductivety of random objects in my house, also keeping in mind the concepts this tool illustrates. Both of the objects I have made help me to remember that electricity flows from positive to negative, Anode to Cathode. The gauge of wire determines the number of electrons that can flow through, thus determining the current. The willingness of an object to conduct is determined by the number of valence shells filled in the compound. This also determines if the object is a conductor or a resistor. Also the illustration comparing the flow of electricity to the flow of water is forever engraved into my brain. I look forward to learning how to use the soldering pencil and all the tools and accessories associated with it.
Hertzian Tales Response
After reading the Hertzian Tales I can conclude that in the
world of electronics that aesthetics has become a topic of discussion for some
artists. When I think of technology, I first think about the purpose of the
device, or program, what does it do? How does it do it? Aesthetics is the last
thing I think about, at first. When I am buying a product, usefulness is my
priority. If I happen across multiple products with the same capabilities, then
aesthetics comes into play. However, aesthetics also plays on the user’s
personality. Whatever the user likes, or dislikes, will determine how the he or
she interacts with the said product. Some people purely use technology for
whatever task they have to complete while others take the device or program and
use them for their own personal use. Like those who have taken apart radios and
made them into art, everyone has their own view and use of a particular device.
Digital art today is what the name implies, the use of technology in a way that
it was not originally intended for. Aesthetics, in turn, is of more importance
than the actual use the device was intended to perform. Though it can be argued
that in today’s market the appearance of a said device has become more
important along with the device’s intended purpose. And that appearance has an
effect on the user. There is a correlation between the device’s exterior
appearance and its user. In stores today you can see a digital camera, whose
purpose is to capture images and video, in several color palettes. What also come
into play are the associated advertisements of these devices. The color palettes
and dialogue affect the viewers into seeing the benefits of said device and
therefore encourage them into buying the product. Humans rely on these devices
for own expression and/or completion or assistance in a task. What the
technology offers them is not in question anymore; now it is how the device
appears and what it can do outside its original purpose that can be expanded on.
Everything around us can be used for other purposes. Most people do it
unknowingly. It is the curious side of us that is beginning to show itself and
ask these questions. Curiosity is what has been the inspiration and backbone of
many of these forms of art, and it will continue to bring up new questions
surrounding these ever so prevalent objects around us. And it is curiosity that is behind the works of many of the artists discussed in the chapters. What is being shown is that the beauty of the electronic device does not rest on the outside, but the inside. And this is the guiding concept behind these works. The reality is that there is a massive sacrifice for simplicity of technology and the beauty of how it all works, and the beauty is being sacrificed. People's desire for simplicity, for ease of use...the beauty of technology is being lost...a sad part of everyday life.
Mechanic Love Poem
PC: Processed Compassion
Welcome home my love; you are back
After a long day at work; you are about to hack
You lie down on the couch and try to relax
Looking upon various shelves of, knick-knacks
And then you look at me
Patiently waiting; your ever loyal PC
You get up and walk over to the table
Careful to not trip over my cable
You press my button and power me on
Just as you let out a subtle yawn
Caressing my keys, ever so gently,
Your words flow through me so smoothly
Every keystroke sends a shiver through my wires
Your voice commands sing like a choir
And as you finish surfing the web
Your strokes beginning to ebb
My feelings for you will never wane
As your love pulses through my veins
You slowly prepare to shut me down
And that makes me want to frown
But I know that you will return
And that is a moment I will always yearn
Because as you already know,
Through sun and snow,
Every day, every night, I await your command
Shortcuts ready of your favorite programs:
Facebook, Gaia, Rhapsody, Youtube
Yahoo, Amazon, Ebay, and Baidu
Though I am but a simple cube
And can be quite slow and rube
You still come back to me night after night
And during every visit I feel high as a kite
But as you shut me off and my view of you recedes
I long for your touch; it is like mead
Until tomorrow my love, sweet dreams to you
And may our love always remain true
Subscribe to:
Comments (Atom)